Jenkins is an open source continuous integration server to automate build, test and deploy pipelines and even more. Jenkins pipelines and libraries have a big benefit as they can be added to SCM. However, testing of pipelines and libraries can be a hassle sometimes, especially when not dealing with it on a daily basis. One way to ease the pain of testing changes or new configurations is to know the different ways how these can be tested.
Manual Testing
Replay Option
The “Replay” feature allows for quick modifications and execution of an existing Jenkinsfile without changing the pipeline configuration or creating a new commit. But remember that replay changes are only temporary, so don’t forget to either update the configuration or commit to SCM once you are satisfied.

Depending on how Jenkins libraries are configured within the project they may also appear in the replay overview. But you won’t see the library part if they are configured as global libraries compared to folder libraries.
Pipeline Configuration
Often when creating a new Jenkinsfile it is often easier to start developing it directly within the Jenkins configuration. This way changes and adjustments can be tested within the Jenkins job without committing and pushing every single change.

Test Pipeline
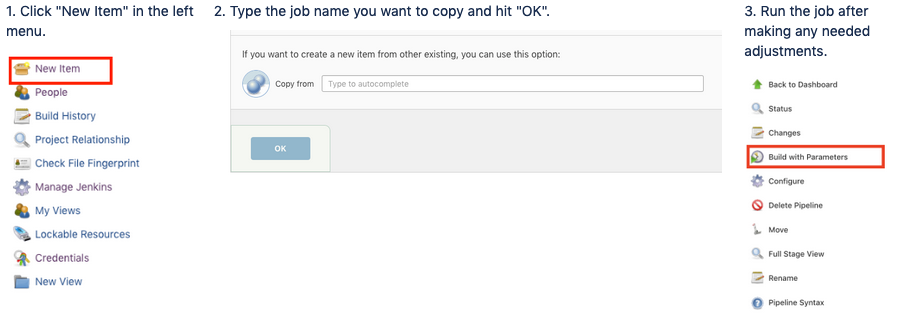
To create a new pipeline job for testing can be an option to not interfere with the main builds and to safely test it. If multiple jobs are involved you may need to create copies of multiple jobs if their configuration changed.

Branching
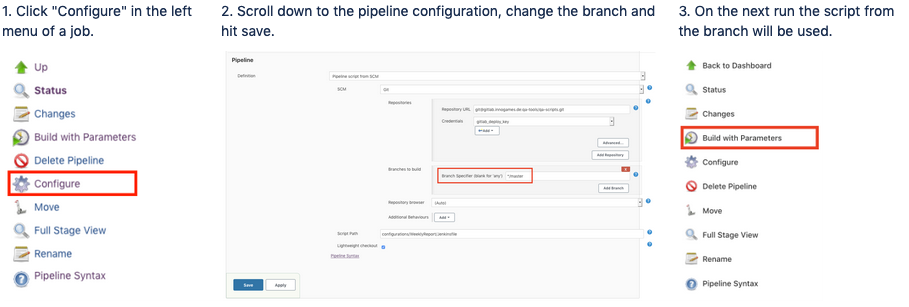
One benefit of using SCM for Jenkinsfiles is the possibility of creating branches for any needed changes. I can only recommend it as any changes can go through a review process which is very beneficial.

For Jenkins libraries branching is often the only option to test changes without affecting the stable master branch. Thus it comes in handy that library branches can be added to a Jenkinsfile and not only one but multiple libraries can be tested together at the same time.
#!groovy

@Library('LibraryName@BranchName') _

import java.text.SimpleDateFormat
#!groovy

@Library(['Library1@BranchName', 'Library2@BranchName']) _

import java.text.SimpleDateFormat
Automated Testing
Jenkins shared library is a powerful way for sharing Groovy code between multiple Jenkins pipelines. However, when many Jenkins pipelines, including mission-critical deployment pipelines, depend on such shared libraries, automated testing becomes necessary to prevent regressions whenever new changes are introduced into shared libraries. There is no built-in support for automated testing, and the Jenkins Handbook even suggests doing manual testing via the Jenkins web interface. There is a better way.
The Setup
Before you can start writing tests, you need to add a few things to your Jenkins library project:
- A JUnit library, Jenkins Pipeline Unit, for simulating key parts of the Jenkins pipeline engine
- A build tool, for compiling and running tests
- A build script, for specifying dependencies and other project configuration
As the build tool I’d recommend Gradle, because it’s fast, flexible, and very Groovy oriented.
brew install gradle
After installing Gradle, add the Gradle wrapper to the project directory.
cd <project dir>
gradle wrappe
To run the tests, run the Gradle test task in the project directory, potentially with artifactory login.
cd <project dir>
./gradlew test
To run a single test class, or even a single test, run Gradle with the –tests option:
./gradlew test --tests MyClassTest
./gradlew test --tests MyClass.checkConfig
Finally to add the build script and jenkins-pipeline-unit to the project, we need to created a file named build.gradle.
group 'com.project.jenkins'
version '1.0-SNAPSHOT'

apply plugin: 'groovy'

sourceCompatibility = 1.8

repositories {
    mavenCentral()
    maven {
        url 'https://repo.jenkins-ci.org/releases/'
        name 'jenkins-ci'
    }
    maven {
        url 'https://repo.spring.io/plugins-release/'
        name 'spring.io'
    }
}

sourceSets {
    main {
        groovy {
            // all code files will be in either of the folders
            srcDirs = ['src', 'vars']
        }
    }
    test {
        groovy {
            srcDirs = ['src']
        }
    }
}

dependencies {
    implementation(group: 'org.apache.commons', name: 'commons-csv', version: '1.8')
    implementation(group: 'org.codehaus.groovy', name: 'groovy-all', version: '3.0.0')
    implementation(group: 'org.jenkins-ci.main', name: 'jenkins-core', version: '2.176')
    implementation(group: 'org.jenkins-ci.tools', name: 'gradle-jpi-plugin', version: '0.27.0')
    implementation(group: 'org.jenkins-ci.plugins.workflow', name: 'workflow-cps', version: '2.41')
    implementation(group: 'org.jenkins-ci.plugins.workflow', name: 'workflow-step-api', version: '2.13', ext: 'jar')
    implementation(group: 'org.jenkins-ci.plugins', name: 'cloudbees-folder', version: '6.7')
    implementation(group: 'org.jenkins-ci.plugins', name: 'config-file-provider', version: '2.7.5', ext: 'jar')
    implementation(group: 'com.lesfurets', name: 'jenkins-pipeline-unit', version: '1.6')
    implementation(group: 'junit',  name: 'junit', version: '4.12')
}

task getDeps(type: Copy) {
    from sourceSets.main.runtimeClasspath
    into 'build/libs'
}
The Report
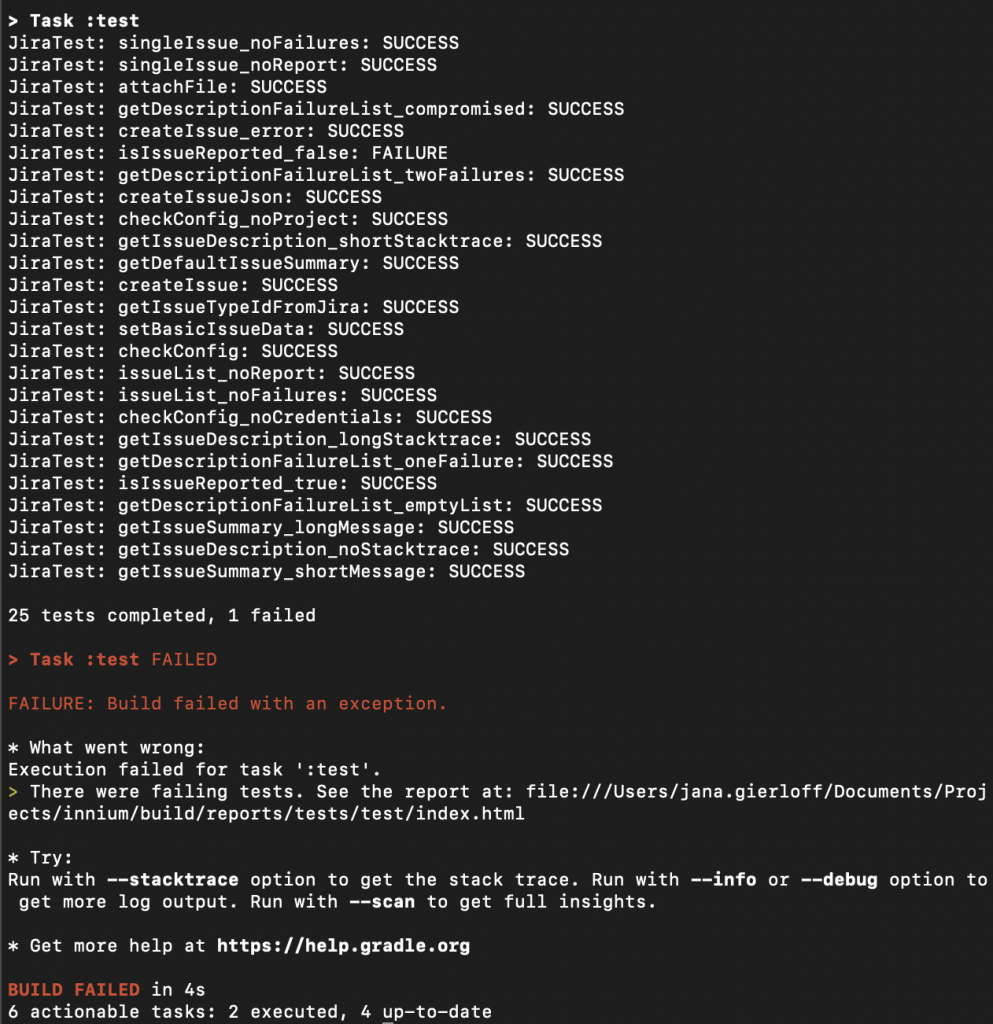
The above Gradle script doesn’t give much information in what is happening during execution and which tests are actually being executed. However, we do see when a test fails and where.

We can add some more information to it by adding the following to the build.gradle script.
test {
    dependsOn cleanTest

    testLogging.maxGranularity = 0

    def results = []

    afterTest { desc, result ->
        println "${desc.className.split("\\.")[-1]}: " +
            "${desc.name}: ${result.resultType}"
    }

    afterSuite { desc, result ->
        if (desc.className) { results << result }
    }

    doLast {
        println "Tests: ${results.sum { it.testCount }}" +
            ", Failures: ${results.sum { it.failedTestCount }}" +
            ", Errors: ${results.sum { it.exceptions.size() }}" +
            ", Skipped: ${results.sum { it.skippedTestCount }}"
    }
}
This will result in a report as follows which lists the executed tests and their status.

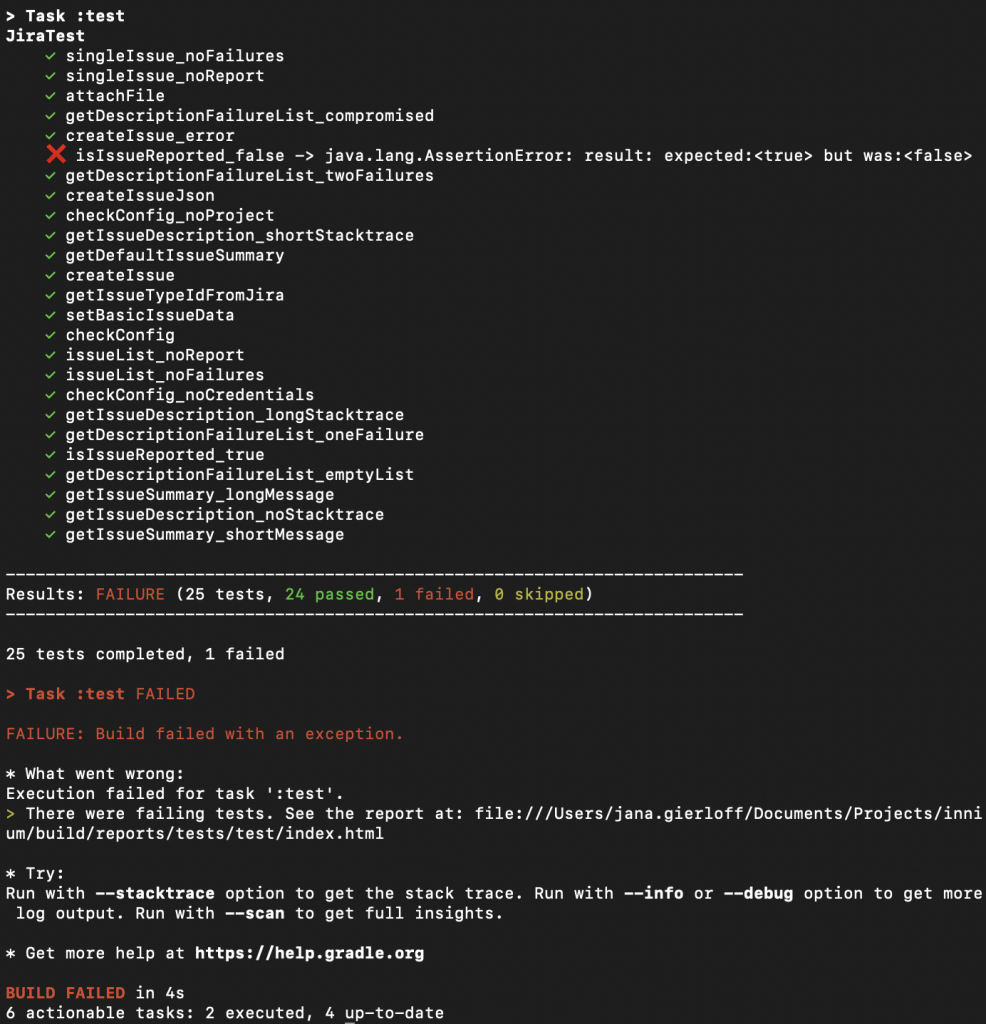
Even though all information is present it is hard to visually differentiate between the failures and successes and maybe a summary would be nice too. Thus, to make the report even more useful and readable we can instead use the following script part in the build.gradle script.
tasks.withType(Test) {
    String ANSI_BOLD_WHITE = "\u001B[0;1m"
    String ANSI_RESET = "\u001B[0m"
    String ANSI_BLACK = "\u001B[30m"
    String ANSI_RED = "\u001B[31m"
    String ANSI_GREEN = "\u001B[32m"
    String ANSI_YELLOW = "\u001B[33m"
    String ANSI_BLUE = "\u001B[34m"
    String ANSI_PURPLE = "\u001B[35m"
    String ANSI_CYAN = "\u001B[36m"
    String ANSI_WHITE = "\u001B[37m"
    String CHECK_MARK = "\u2713"
    String NEUTRAL_FACE = "\u0CA0_\u0CA0"
    String X_MARK = "\u274C"

    dependsOn cleanTest

    testLogging {
        outputs.upToDateWhen {false}
        lifecycle.events = []
    }

    beforeSuite { suite ->
        if(suite.parent != null && suite.className != null){
            out.println(ANSI_BOLD_WHITE + suite.name + ANSI_RESET )
        }
    }
    afterTest { descriptor, result ->
        def indicator = ANSI_WHITE

        if (result.failedTestCount > 0) {
            indicator = ANSI_RED + X_MARK
        } else if (result.skippedTestCount > 0) {
            indicator = ANSI_YELLOW + NEUTRAL_FACE
        }
        else {
            indicator = ANSI_GREEN + CHECK_MARK
        }

        def message = '    ' + indicator + ANSI_RESET + " " + descriptor.name
        if (result.failedTestCount > 0) {
            message += ' -> ' + result.exception
        } else {
            message += '                            '
        }
        out.println(message)
    }

    afterSuite { desc, result ->
        if(desc.parent != null && desc.className != null){
            out.println("")
        }

        if (!desc.parent) { // will match the outermost suite
            def failStyle = ANSI_RED
            def skipStyle = ANSI_YELLOW
            def summaryStyle = ANSI_WHITE

            switch(result.resultType){
                case TestResult.ResultType.SUCCESS:
                    summaryStyle = ANSI_GREEN
                    break
                case TestResult.ResultType.FAILURE:
                    summaryStyle = ANSI_RED
                    break
            }

            out.println( "--------------------------------------------------------------------------")
            out.println( "Results: " + summaryStyle + "${result.resultType}" + ANSI_RESET
                + " (${result.testCount} tests, "
                + ANSI_GREEN + "${result.successfulTestCount} passed" + ANSI_RESET
                + ", " + failStyle + "${result.failedTestCount} failed" + ANSI_RESET
                + ", " + skipStyle + "${result.skippedTestCount} skipped" + ANSI_RESET
                + ")")
            out.println( "--------------------------------------------------------------------------")
        }
    }
}
Now we have structured and visual report for the executed tests along with a summary of the results.

Writing Tests
Tests that use Jenkins Pipeline Unit are written as JUnit test classes that extend com.lesfurets.jekins.unit.BasePipelineTest. This class provides properties and methods for accessing the script variable binding, loading scripts, creating mock steps, and simulating other features of Jenkins pipelines.
To make things easier and reduce code duplication within each test I would advice to create your own TestBase which can take care of the test setup which is the same for all tests.
import com.lesfurets.jenkins.unit.*
import groovy.json.*
import java.io.File
import org.junit.*

class TestBase extends BasePipelineTest {
    Script script
    String shResponse
    Boolean fileExists

    @Before
    void setUp() {
        super.setUp()
        helper.registerAllowedMethod('withCredentials', [Map.class, Closure.class], null)
        helper.registerAllowedMethod('withCredentials', [List.class, Closure.class], null)
        helper.registerAllowedMethod('usernamePassword', [Map.class], null)
        helper.registerAllowedMethod("sh", [Map.class], { c -> shResponse })
        helper.registerAllowedMethod("fileExists", [String.class], { f -> fileExists })

        // load all steps from vars directory
        new File("vars").eachFile { file ->
            def name = file.name.replace(".groovy", "")

            // register step with no args
            helper.registerAllowedMethod(name, []) { ->
                loadScript(file.path)()
            }
            // register step with Map arg
            helper.registerAllowedMethod(name, [ Map ]) { opts ->
                loadScript(file.path)(opts)
            }
        }
    }
}
The test itself would then only include the test specific setup.
import project.jenkins.configs.*
import project.jenkins.common.*
import java.text.SimpleDateFormat
import org.junit.*
import org.junit.rules.ExpectedException
import static groovy.test.GroovyAssert.*

class JiraTest extends TestBase {
    def jira
    InniumConfig config = new InniumConfig()

    @Rule
    public ExpectedException thrown = ExpectedException.none()

    @Before
    void setUp() {
        super.setUp()
        script = loadScript("src/test/resources/Jenkinsfile")

        Map env = ["BUILD_URL": "http://abc.de/"]
        binding.setVariable('env', env)
        binding.setProperty('uname', new String())
        binding.setProperty('psswd', new String())

        config.testPath = "abc"

        jira = new Jira(script, config, new Serenity(script, config))
    }

    @Test
    void getDefaultIssueSummary() {
        String date = new SimpleDateFormat("yyyy-MM-dd").format(new Date())
        String expected = "[Innium] Automation Test Failures // $date"

        String actual = jira.getDefaultIssueSummary()
        assertEquals("result:", expected, actual)
    }
}
This is already an example of how a method can be tested, the corresponding class would be similar to the following.
package project.jenkins.common

import project.jenkins.configs.*
import java.text.SimpleDateFormat

class Jira {
    private final Script script
    private final InniumConfig inniumConfig
    private def report

    Jira(Script script, InniumConfig innium, def report) {
        this.script = script
        this.inniumConfig = innium
        this.report = report
    }

    private String getDefaultIssueSummary() {
        String date = new SimpleDateFormat("yyyy-MM-dd").format(new Date())
        return "[Innium] Automation Test Failures // $date"
    }
}
An often-used approach is to use vars within you usually find single steps which can be called in pipelines. The following is a step that converts the test to its strictly alphanumerical form.
def call(Map opts = [:]) {
    opts.text.toLowerCase().replaceAll("[^a-z0-9]", "")
}
In comparison to test a method in a class, we do not need to instantiate the class and directly load the script.
import org.junit.*
import com.lesfurets.jenkins.unit.*
import static groovy.test.GroovyAssert.*

class ExampleTest extends TestBase {
    def example

    @Before
    void setUp() {
        super.setUp()
        example = loadScript("vars/example.groovy")
    }

    @Test
    void testCall() {
        def result = example(text: "a_B-c.1")
        assertEquals("result:", "abc1", result)
    }
}
Mocking Steps
In order to test only necessary parts and exclude Jenkins build in steps, we need to mock these parts. Those can look a bit tricky and difficult to figure out the correct types.
// returning a path
helper.registerAllowedMethod('pwd', [], { '/foo' })

// returning the shell response
helper.registerAllowedMethod("sh", [Map.class], { c -> "123456abcdef" })

// mocking credentials and setting the properties
helper.registerAllowedMethod('withCredentials', [Map.class, Closure.class], null)
helper.registerAllowedMethod('withCredentials', [List.class, Closure.class], null)
helper.registerAllowedMethod('usernamePassword', [Map.class], null)
binding.setProperty('uname', new String())
binding.setProperty('psswd', new String())

// mocking the script step
helper.registerAllowedMethod('script', [Closure.class], null)

// returning either case depending on the test
helper.registerAllowedMethod("fileExists", [String.class], { f -> true })
helper.registerAllowedMethod("fileExists", [String.class], { f -> false })

// returning a list of files
helper.registerAllowedMethod('findFiles', [Map.class], { f -> return [new File("path1"), new File("path2")])
For some build steps, it can also make sense to spend more time mocking them when those results are required and needed to validate the functionality.
import groovy.json.*
// writing content to a file
helper.registerAllowedMethod("writeFile", [Map.class], { params ->
    File file = new File(params.file)
    file.write(params.text)
})

// reading text as JSON
helper.registerAllowedMethod('readJSON', [Map.class], {
    def jsonSlurper = new JsonSlurper()
    jsonSlurper.parseText(it.text)
})

// reading a file
helper.registerAllowedMethod("readFile", [String.class], { params ->
    return new File(params).text
})


// reading CSV
helper.registerAllowedMethod("readCSV", [Map.class], { params ->
    ArrayList csv = []
    String[] lines = new File("filePath").text.replaceAll(/"/, '').split('\n')
    String[] titles = lines[0].tokenize(";")

    for (int i = 1; i < lines.size(); i++) {
        if (lines[i].trim() == '') {
            continue
        }
        String[] row = lines[i].tokenize(";")
        Map data = [:]

        for (int j = 0; j < titles.size(); j++) {
            data[titles[j]] = row[j]
        }
        csv.add(data)
    }
    return csv
})
Conclusion
Testing Jenkinsfiles and libraries can be tedious so knowing how to best test them is a huge advantage. Each change should ideally be tested manually at first to make sure it actually does what is expected in the actual environment. To avoid regressions issues and side effects of changes it is advised to add automated tests to a library. This will not only minimize the trouble but also increase the confidence when dealing with Jenkins scripts. Happy testing!
InnoGames is hiring! Check out open positions and join our awesome international team in Hamburg at the certified Great Place to Work®.

